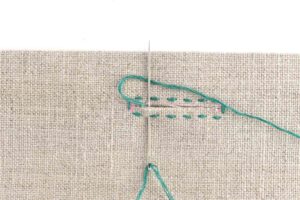
The buttonhole stitch, a close cousin of the blanket stitch, adds a touch of elegance and strength to any garment. By working these stitches around a carefully made opening, you create a functional and beautiful way to fasten your buttons.
Follow this step-by-step guide to learn how to buttonhole stitch like a pro.
Materials:
- Sharp embroidery needle
- Thread (color to match your fabric or button)
- Fabric scissors
- Fabric pen or pencil
- Ruler
- Thimble (optional, for protection)
- Embroidery hoop (optional, for holding the fabric taut)
Steps:
1. Measure and Mark:
Decide on your button placement and mark the spot with your fabric pen.
Measure your button and add a bit extra (around 1/8 inch or 3 millimeters) for wiggle room. Mark the length of the buttonhole on your fabric.
From the ends of the buttonhole line, draw short lines perpendicular to create a channel – this will be the base of your stitching.
2. Prepare Your Needle and Thread:
Thread your needle and knot the end. You can use a simple knot or a double knot for extra security.
Consider waxing your thread to prevent tangles, especially if using a longer length.
3. Start Stitching:
Push your needle up from the back of your fabric, just outside the line marking the edge of the buttonhole.
Bring the needle back down through the fabric, catching a few threads along the perpendicular line you drew earlier.
Here’s the key difference between a blanket stitch and a buttonhole stitch for the first stitch only, create a small loop with your thread as you pull the needle through. Pass the needle tip back through this loop to secure it before pulling it tight. This knot will anchor the beginning of your stitches.

4. Start with a Secure Anchor Stitch
Bring your needle up from the back of the fabric, near the edge where you want to begin your buttonhole stitch. Insert the needle back into the fabric at the same point, but leave a small thread loop on the surface. This loop will become the first “button” of your buttonhole stitch. Pull the thread gently to tighten the loop and secure it in place.
5. Create the Buttonhole Stitch
Now that your anchor stitch is in place, it’s time to start the buttonhole stitch. Bring your needle up from the back of the fabric, just outside the loop of your anchor stitch. Then, insert the needle back into the fabric through the loop, wrapping the thread around the needle as you do so.
6. Repeat and Space Your Stitches
Continue making buttonhole stitches along the edge of your fabric, spacing them evenly apart. As you work, make sure to keep your stitches uniform in size and tension for a neat and professional-looking finish. Experiment with different stitch lengths and angles to achieve different effects.
7. Continue Stitching the Sides:
With subsequent stitches, mimic the first stitch, but without creating a loop. Catch a few threads from the fabric with each stitch, working your way up the side of the buttonhole channel.
Maintain consistent spacing between your stitches for a neat finish.
8. Turning the Corner:
Once you reach the top of the buttonhole, make a small horizontal stitch across the end of the channel.
Now, rotate your fabric slightly and begin stitching down the other side of the buttonhole channel, following the same technique.
9. Finishing Touches:
As you reach the bottom of the buttonhole, make a final horizontal stitch to secure the end.
Weave the tail of your thread under previous stitches to hide it and snip off any excess.
10. Practice and Experiment
Like any skill, mastering the buttonhole stitch takes practice and patience. Don’t be discouraged if your stitches aren’t perfect at first – keep practicing, and you’ll improve over time. Experiment with different thread colors, stitch lengths, and patterns to create unique and personalized designs.
Tips:
- Practice on a scrap piece of fabric first to get a feel for the stitch.
- Use a thimble to protect your finger as you push the needle through the fabric.
- An embroidery hoop can help keep your fabric taut, especially for beginners.
There are variations of the buttonhole stitch, like the round-ended buttonhole. With practice, you can explore more decorative styles.
By following these steps and practicing our technique, you’ll be creating strong and beautiful buttonholes in no time!
Conclusion
Buttonhole stitch is a timeless embroidery technique that adds elegance and charm to any project. By following these simple steps and practicing regularly, you’ll soon be able to create stunning embellishments and edgings with ease. So grab your needle and thread, and start stitching your way to beautiful handcrafted creations!
